Monday, 22 October 2012

Back to Front / Vice Versa

Oh dear.

This morning, Nina was meant to be having both of her rear side windows fitted, then after 'Rustgate' yesterday, I had resigned myself to just having the one fitted then the rusty frame repaired.

What actually happened, was that the day started off drizzly and wet and dark, and Dave called first thing to cancel, which was fair enough, but Orange decided not to tell me until almost an hour and a half after he left the message, meaning I was out turning Nina around on the drive to make it easier for him, them waiting, for him not to turn up, apparently.

Once my despair of the whole situation subsided a bit (:S), I realised that actually, this might not be a bad thing, maybe, I should get the window frame fixed first, then get Dave to fit both windows in one go, as planned originally.

So thats what I did, I've now taken Nina in to Bedford Street Motors, where Malcolm is going to strip the bad metal off, treat it, make good, then paint ready for the window to be bonded to at the end of the week, or weekend, hopefully.

The rust will most likely rear its head again in a few years, but the only way to stop that is to change the whole quarter panel for a new one, and I just dont have the money to do that right now. Maybe if and when it needs it in the future, I'll get it done.

So, thats where we are with it at the moment. Just a waiting game until Malc and Jon say I can go pick her up again.

Going to be so glad when these windows are done and dusted ! :).


- Posted using BlogPress from my iPad

Location:Gloucester

Sunday, 21 October 2012

Window Work....

Been a while since an update, with lots of inside stuff having to wait until things were watertight, I got a bit demotivated. Been busy with other things too, but hopefully thats going to change over the winter.

I finally got around to ordering the rear 2 side windows. As I said in a previous post, Vehicle Leisure Windows would not quote for them, so I ended up going to a company called Vanbitz in Barnsley. He had the solid (non vented) windows for the back side windows, and could supply them for £246 delivered, including the fixing/bonding kit.

So, I ordered them, 28th September, hoping to have them in time for the following weekend. I got an email saying that his supplier didn't have stock, and they were trying to source some more. Got a little worried, until a couple of hours later I got another email saying that they had managed to source them, and I would receive them in 7-10 days.

Well, three weeks after paying, I still didnt have my windows. When I emailed asking why on the monday, I got an email on Tuesday saying he had only got the windows the day before, and I should receive them that day, or tomorrow, tomorrow being Wednesday. Despite asking for tracking details a couple of times, none were forthcoming.

No windows turned up tuesday or wednesday, so he had lied to me making me think that the windows were on the way. Not happy.

However, I got an email, late on on the wednesday, from Vehicle Leisure Windows, the original company that wouldnt quote me, saying my order had been dispatched, with a tracking link to Interlink Express.

How odd :S. Hadn't been quoted, let alone ordered and paid for windows from them.

Well, it turns out Vanbitz 'supplier' was Vehicle Leisure Windows, I was actually quite happy about this, as I had lost all confidence in Vanbitz, especially after reading a review for them online saying they sell inferior products. I have to say though, it was one review, on the whole net, so I cant judge them just by that, all the same I was happy Vehicle Leisure Windows were actually supplying them, as they have lots of good reviews on the Self Builders forums, I just dont understand why it was so difficult getting them to give me a price on the windows.

Anyway, from there on in, Interlink's tracking process was second to none, even telling me what hour slot the windows would be delivered in making it easier for one of us to be home to sign for them. They arrived Thursday dinnertime :)

They came with a double fixing kit for two windows, AND the internal trim for the metal edge of the frame.

For the next windows, I hope I can get a quote direct from VLW, will save so much hassle !

So, now I had them, I CHICKENED OUT of actually fitting them, I just didnt want anything else to go wrong. So I called Dave at Five Valleys Windscreens, and asked him, if I took the old windows out, cleaned up the frames ready, would he actually come fit the windows, he offered to do just that for a very good price. The plan was for me to remove the windows and do the clean up over the weekend, and he would come and fit the windows Monday. Brill !

SATURDAY -
Well, today was the day, so I took my knife, and started cutting in to the rubber seal on the passenger side window, I had now passed the point of no return !


It turns out the seal had the window stuck in there pretty good ! With some very determined cutting, finally, the window came out, thankfully, in one piece, I intend to sell the windows I remove to help out with the cost of the new windows.


Once I pulled the large rubber seal off, I was left with this unsightly mess, I knew I was in for a tough time cleaning that up !

But clean it up I did, sharp knife and my brake and clutch cleaner with a non scratch scourer. Took at least a couple of hours, and I ached quite a bit afterwards.


It was starting to get dark, so decided to leave the second window until Sunday. I cut some tarpaulin up to slightly bigger than the window aperature, and sealed it all up with Fabric Tape.


SUNDAY -
After yesterdays success, I started today with high hopes, knowing what you are dealing with really helps the old confidence, and within about 10 minutes, I had the second window out, in one piece again !

Pulled the large rubber seal away.

Then I saw it.

The frame was eaten away by rust :(.

Instead of sorting out the leaks properly as they happened, the NHS mechanics just kept sealing it, which, unlike the other side, which was letting the water flow inside quite freely, it held the water and caused the frame to bubble and rust :(. When I took the the seal off from the top of the frame, lots of water dripped down :(.


As you can see, totally different to the opposite side, no amount of cleaning up will get this side ready for a new window glass. :(

But I did clean it up, the best I could get was this.


Not good :(.

Will see what Dave says tomorrow, if its not possible to fit this side tomorrow, Nina is provisionally booked in for Tuesday at Bedford Street Motors to see what they can do. If they can make it all solid again, I can get the window put on. In an ideal world.

So now Ive sealed up that side too, its a waiting game until tomorrow morning, when Dave is coming out to fit them.

Everybody cross your fingers for Nina, and hope she can get fixed as quickly, and cheaply as possible !

Hopefully, come bak and see a pic tomorrow of at least one window fitted :).


Posted using BlogPress from my iPad

Location:Gloucester

Thursday, 4 October 2012

Post 72 - Milestone

This post equals the number of posts I made for Scooby's blog in total ! Also, its just over a year since Nina came in to our lives.

The difference on this blog, is that there are likely to be at least 72 MORE posts before it reaches a conclusion ! :).

So to mark it, and make the post a little more special, I have put together a video slideshow of the past year in photos for you to see in around 6 minutes, the changes, all in one place.

There is something else special about this video too !

Any of you attending festivals and VW meets around the country, ie VanWest back in September etc, you may have been treated to some live music. One of the artists playing to you would have been Kludo White performing tracks from his album Camper Van Radio with his band.

I have just ordered the album through their website via Paypal, its only £7.99 plus postage, and here is the thing, the profits from the album are being donated to the Teenage Cancer Trust. Kludo hopes to raise £20,000 in 2012, and I hope that many of you reading this blog, will pop over to www.campervanradio.com and order one too. If you are self building a VW camper, or any other camper, like Nina, you will find the songs relevant, fun, catchy, brilliant !, and all while helping charity. What better way is there ?
The song playing in the video is Camper Van Driver, one of the tracks from the album. The album is also available through iTunes.

Go buy it ! You wont regret it :).

In the words of Del, 'you know it makes sense...' ;).

So, without further ado, crank the volume up, sit back, and click play below :).


- Posted using BlogPress from my iPad

Location:Gloucester

Friday, 28 September 2012

Mini News Update....

Not much has been happening with Nina since I did the blind guides on the sliding door, that is to say, NOTHING, has been happening. Time and cashflow have been against me. The weather has been awful again, lots of rain, and whilst the rain is getting in, I am loathe to do anything to the inside as it will just be ruined by the leaky windows. Pretty much all the windows leak now depending on how hard the rain is coming down, but the front 4 side windows generally dont leak enough to run off the window sills.

Last weekend, Nina took us to Slough for a show, it rained the whole time, and things that were piled at the back either side got a little damp :(.

For the past few weeks, I have been advertising my very posh HD Canon camcorder on ebay, with a view to raising funds toward the windows, it finally sold this week, so I have some good news !

Reading the blogs about self builds, lots of people have been recommending Leisure Vehicle Windows to get their bonded windows from. So, money in bank, I emailed them, sending pictures of Nina and a close up of the current windows, and asked for a quote for one rear window, and another quote for both rear windows in the hope that I could afford the latter. Not hearing anything back the next morning, I decided to call, and see if they could understand my ramblings in the email, they aplogised, said they had been very busy, and they would email me the quote in a while, once they understood what it was I wanted.
2 days went by, and I am starting to get a little fed up, so yesterday decided to call again, once again they apologised, and said they were waiting on a quote from Renault as they had to buy them direct from the manufacturer. Promising the quote via email within a couple of hours.
That was yesterday, and still, I have heard nothing.

Im sorry Leisure Vehicle Windows, but you suck, from my experience. It doesnt take days to get a quote from Renault, it takes minutes and a quick phone call, as I rang them myself, and that is all it took.

Sadly, not being 'in the trade', their quote to me was highly extortionate, running in to hundreds PER WINDOW.

I was starting to think I was doomed with these bloomin windows. Nobody seems interested in supplying them !

Searching the internet further, I found another company called VanBitz based in Barnsley. They can supply the fixed (non vented) windows in green tint with the fixing kit (glue), delivered to me for just over £123 per window, not as cheap as I would have liked, Leisure Vehicle Windows were quoting £65 per window in last years price list, but then, they dont seem able to supply them this year for some odd reason.

Anyway, I have ordered both the rear side windows, the ones that leak the most, and hopefully they will be here next week, so I can maybe get started on the following weekend. Just lots of swatting up now on how to fit them properly. Last thing I want is them falling off as I drive down the road !

I am sure I will also have a nightmare job once the old windows are out, cleaning the old rubber, glue and silicone off of the metal, but it has to be done, and once it is, hopefully I'll never have to worry about them again !

Will have some more window tinting to do as well ! Think I will buy a bigger roll of it this time, to do all 6 side windows as and when I buy and fit them.

Thats it for now, will let you know how good VanBitz (www.vanbitz.co.uk) are in the next post which will hopefully be showing you at least one of them fitted ! More realistically the pain I am going through removing the old ones though ;).

Want a pic to remind you of what I have ahead of me ? Oh go on then :P


Please be kind to me Nina ! ;)


- Posted using BlogPress from my iPad

Location:Gloucester

Saturday, 15 September 2012

Guided By The Blinds

A job I had always intended on doing, was finishing off my window frames with 'fills' or 'guides' for my blinds on the back of the frames.
This would have two purposes, the first, to guide the blinds down and prevent them from moving side to side, and secondly any gap that was viewable from the outside while the blinds were down, would be blocked.
Well, as I have been using Nina since they have been done, one of the blinds has been a bit of a headache, the one on the sliding door, because each time I slide the door shut, the Blind swings violently from side to side, sometimes twisting out of the frame and creasing, and sometimes, the plastic weight on the bottom, which slides onto the fabric, and is held in position by a plastic cap on either end, well the plastic caps sometimes pop out and then the bottom plastic trim/weight slides out and gets trapped in the door when I close it.
You can probably get a better idea what I am talking about from this photo -


Here you can see how much room it has either side to swing once the frame is on.
This is the damage that is being caused to the blind by its bashing against the frame and twisting -


Thats some nasty fraying :(. These blinds were SO expensive (£5 each for these smaller ones :P) that I really dont want to have to replace them anytime soon !
So I took the frame off, along with the blind, laid it down flat, set the blind bang in the centre, and marked the edges where the wooden battens had to run to give enough space to fit glue some carpet to finish it off, but also close enough to stop the blind moving side to side enough to allow it to come outside of the frame completely.


This is the frame with the battens nailed on, short enough to fit between the upper and lower wooded frames I have fixed to the metal on the door, and just right for the blinds.


A little close up showing it is in fact a 'guide' and sporting my rather fancy pencil marks :P.
Once the frame was fitted back on, I am happy to say it all fitted back together with the new wood, so I didnt have to adjust anything :).


You can just about see the new guides in this next photo, doing its job superbly !


I can slam the side door shut now, even with the blind down, and there is no movement whatsoever, and the blind stays in the down position which is going to be really handy for parking up and dropping the blinds to stop any would be thieves seeing in. Will keep Nina a bit cooler inside too, even though the tinted windows cut out a lot of the heat of the sun anyway.
One thing I did realise with this blind, is that there is no room at the top to fit an LED blue light bar to match all my other downlighters on each of the other blinds, so need to think of something. Only today I found a sliding door contact switch that will allow power to reach the lights when the door is in the closed position, from the main vehicle body.
Now, for all you media hungry people, a little treat for you now, I did a small video explaining the above stuff in my insanely boring Bristolian accent and ACTUALLY showing the door being shut and the blind not moving ! WOW, you is so lucky ;).


Thanks for looking again, this blog would be pointless without you lot reading it, not that many of you comment to let me know you are reading, but I can see from the page stats in Blogger :P
Please do leave comments, they really do spur me on.
- Posted using BlogPress from my iPad

Location:Gloucester

Saturday, 8 September 2012

Back on track......

A couple of posts ago, I told you about my mishap while transporting a petrol lawnmower, it rolled back and forth and punched a big hole in my 'static' seat.

Well today I got round to fixing it, I don't know why it took me so long to do it, it was a fairly easy job, and I already had a spare panel of the right size 6mm ply.

This was the old panel, removed from the seat with the hole punched out ...


This would have been on the inside of the seat, just in the front of the chemical toilet compartment. Luckily it didnt punch far enough to damage the toilet !

This is the seat, with the panel removed, ready for the new one !


Sorry about the horrible orangey lighting, as usual I took these photos with my iPhone, its just more convenient than using my DSLR and no chance of getting sawdust inside ! The top is the 'front', the seat is on its 'back' to make it easier to nail the new panel on.


And here it is, nailed on and ready for covering.....again. Excuse the gap on the left there, as I was using my circular saw to cut to size, the waste dropped where I didnt have it supported, and made the saw go off on a tangent. Too much haste and not enough care, lesson learned ! Luckily it wont show when I put the finishing lining on.

Oh, and another mistake, you can't see here, but when I was nailing the two cross members a third and two thirds up the panel here, I just merrily went on and did it without any measuring or pencil marks, and just as merrily missed the battens underneath all the way along ! Cue two pencil marks from side to side and some hasty re-nailing ! ::red face::

Here we see my seat back where it belongs all fixed and waiting to be finished off when the rest of the interior is done.


Yay :). Now to make sure I secure anything that I am transporting in future properly so that it doesn't happen again.

I am thinking about introducing some very low profile wheels into the pull out seat to make the process of pulling it out when the storage is full a bit easier. I have an idea on how to do it, will fill you in if and when it happens.

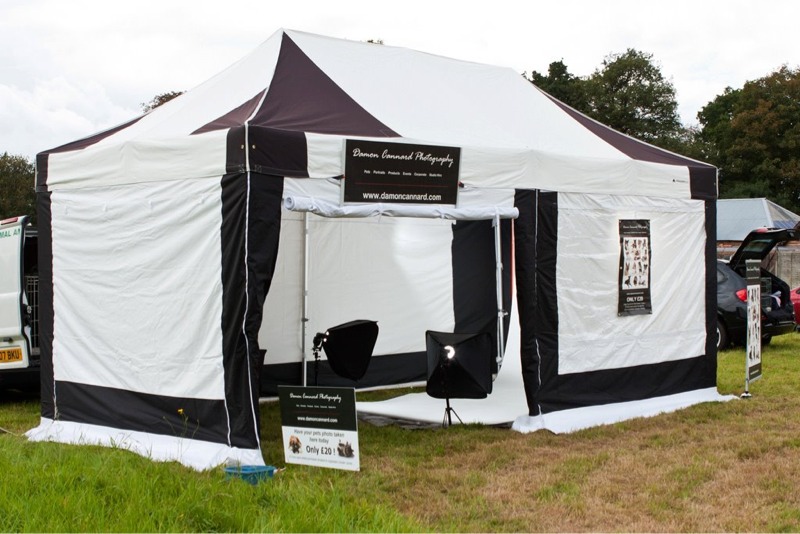
Another finally today, I put my new dog cage in place across the back of Nina, underneath where the kitchen will eventually be. It fits ok, from back to front is right on the maximum that I allowed, so thats good for the dogs, they have the biggest available space, but I have no room for errors in my storage at the back, so I m hoping my big pop up marquee (portable photography studio) I take to the rescue dog shows I attend, will still fit whre I intend it to, stood up on the passenger side right in the back corner.


This is the beast all set up at a show, its amazing how small it packs down, but even then takes up a fair amount of room, so I need it standing, all 70 plus kilos of it ! It also has two big bags that carry the sidewalls which I am hoping will strap on top of it once its in situ.

This is my cage in place, I can see now its there kind of how things are going to end up, but then I have the plans in my head, sort of :S, so apologies to you all if it just looks like a cage in the back of a van, which of course it is without imagination ;). Talking of imagination, imagine some blue LED downlights in the roof of the cage matching the downlights above each of the blinds in the side windows, adding some more atmospheric lighting when camping on an evening. Obviously turn them off when the dogs go to sleep !


Going right across the top of that will be my Smev Sink/Hob combi built in to a wooden surround and worktop, with cupboards from floor to ceiling either side.


This is my Smev Sink & Hob that Jen bought me for Christmas last year, its still sitting in its box on top of the cupboard, can't wait to be at the stage where I am fitting it ! :) Its the same one that I had in Scooby, and it looked AWESOME, really finished the look of the camper off as well as being the 'kitchen'. Here it is in Scooby just to refresh your memories :)


While I was sitting looking at my cage, I started thinking about the cupboards either side, and looking at the wheel arch boxes the Ambulance conversion people made, I wonder if they need to be so big, if they do, I could at least make them square and more useful for storing things on top, so I guess thats another job, take one off and see if I can squeeze out some more storage space somehow, even if its only a couple of inches.


You can see from the mark on the wall that this is where one of the fold up crew seats was positioned. I need to store the gas bottle on one side, and if I can gain a few inches from the length, then it may be able to be seated on the floor, rather than higher up, which I would prefer.

Well, thats it for today, been a fairly busy one so not an awful lot done, just a lot of ideas going around in my head.

Oh, I did find a Vauxhall Movano on eBay that was being broken for spares, it had all the bonded side windows I wanted, but sadly they had all been sold by the time I saw them, so its still buying new ones a couple at a time until they are all done. Probably a better option anyway, saves all that cleaning up ! ;)

- Posted using BlogPress from my iPad

Location:Gloucester

Friday, 7 September 2012

Safari, so good.......

For quite a while now, in fact, more than 18 months I think, which is in fact longer than I have owned Nina for, I have been intending on trying out the Safari Room, or some call it a Privacy Room (something I shall refrain from calling it after my lovely friends on Facebook ribbed me for saying I wanted to 'try out my privacy room but the weather was spoiling my fun as usual', somehow they managed to turn that innocent remark in to something a lot less innocent ! :S).

Anyway, my 'Safari' Room came with my awning that Jen bought me for my 40th Birthday last year, and has been sat on top of the cupboard in the office ever since.

Last Wednesday, I had to bring Nina down to our field to pick up a ride on lawnmower, and as the weather was brill, I brought the 'Safari' room along to try out.

Its fairly easy to put up, although I didnt do a good job of it, I need to oractice a little more as the sides were stretched slightly and wrinkled and I didnt have the awning at the right angle, which was hard to see at the time, but is clear from the photos I took.

Just to remind you, my awning is a Fiamma Caravanstore Bag Awning, I like these awnings because they are so easy to fit, and remove if needed, you just fix an awning rail aling the roof line and feed the bag through it like you would an awning on a caravan. I had the same type of awning on my last camper, Scooby, they are easy to roll out and use, and once the legs are in place actually very rigid and strong.


It will double the living space, while keeping drifting rain from coming in the side door if left open which could be very handy. Obviously you would only use it if you were intending to park up for a period of time, without needing to drive off. I should say, these systems are intended for caravan use, where you would put it all up, then use your car to drive away. This would be ideal for me if camping the night before a show or something.

You can see it doesnt look quite right in the above photos, wrinkles on the roof bars, and a bit skew whiff, but for the purposes of making sure all the bits were there it was fine. Also you will notice I didnt peg it out, which willmake it look straighter too.

The front can either have the single doorway rolled up, or as in the second photo, the whole window section rolled up, or in fact the whole front rolled up, which would be really nice if you had a nice view eating your evening meal :).


It's easier to see in these photos how much extra living space is created, ideal if you are taking pets on holiday with you, or kids etc. You could set up an extra bed in it too if expecting friends.

The large side windows are clear plastic, but can be rolled up to let air through, with a handy insect netting left in its place.

I think it really suits Nina, what do you think ?

It's hard to show the inside without a really wide angle lens camera, I may take one with my iPhone fisheye lens next time, I didnt have it with me when these were taken. But I did take a couple....


This is from the rolled up front window looking in to the side door from the front of the room.


This is from just outside the side door looking out to the left and showing the front window rolled back down !


And finally this one is from just inside Nina looking out the side door. You can see here how much weatherproofing the Safari Room provides which can only be a good thing with our British weather !

Taking it all back down and packing away is very quick, Im pretty sure that once you got a routine (and you know what you are doing !), you'd have it all packed away in less than 20 minutes.

You do need a small pair of steps, especially with a high van like Nina, to fix it up to the roof, and if working on grass, make sure you have a board or something to place the steps on, or you sink the legs into the grass when you step on it, well I do anyway !

When I have learnt how to put it up nice and straight, and have it all pegged out, I will put some more pics up hopefully with some better photos to show you what the inside looks like.

Nothing else has really happened, I am currently selling my Canon Camcorder to fund the two windows at the back that are leaking the worst, so if it sells I may have some news soon that I can start work on building the interior and lining it ! :)


- Posted using BlogPress from my iPad

Location:Gloucester